
Oh, honey, let me tell you about these Cheddar Garlic Dinner Rolls – they’re the stuff dreams are made of! Picture this: golden-brown rolls fresh from the oven, their tops glistening with melted butter, that irresistible garlic-cheese aroma filling your kitchen. I swear, every time I pull these out of the oven, my grandkids come running like they’ve got a sixth sense for baked goods.

Table of Contents
Table of Contents
This recipe has been my secret weapon at family gatherings for years. Remember that Thanksgiving when Uncle Bob ate six rolls before dinner even started? (I didn’t say a word – just kept passing the basket his way!) What makes these rolls special isn’t just the gooey cheddar or the garlicky goodness – it’s how they bring people together. There’s something magical about tearing open a warm roll and watching that steam escape.
Now, I know what you’re thinking: “Jo, homemade yeast rolls sound complicated.” But trust me, if I can make these with my arthritic hands while simultaneously refereeing grandkids, you can too! The secret’s in taking it step by step – and I’ll walk you through every bit.
Why You’ll Love These Cheddar Garlic Dinner Rolls
Listen, these aren’t just any dinner rolls – they’re little clouds of cheesy, garlicky heaven that’ll have everyone begging for seconds. Here’s why they’ve been my go-to for decades:
- That perfect texture: Soft as a pillow inside with just enough chew to make you savor every bite. The secret? A good long knead and that magical first rise.
- Flavor bombs: Sharp cheddar melted right into the dough (none of that sprinkle-on-top nonsense) and just enough garlic to make things interesting without overwhelming.
- Easier than you think: No fancy techniques here – if you can stir and wait patiently (the hardest part!), you can make these beauties.
- Freezer-friendly: I always double the batch and freeze half. Pop ’em in the oven straight from frozen when surprise guests show up – instant hero status!
Honestly? The hardest part is not eating them all straight from the pan. But hey, I won’t judge if you do!
Ingredients for Cheddar Garlic Dinner Rolls
Now let’s talk ingredients – and I mean the good stuff! Every item here plays a special role in creating those perfect rolls. I’ve learned through trial and error (and many flat rolls in my early days) that quality matters here.

- 1 cup whole milk, warmed: Not hot! Just baby-bottle warm (about 110°F). Skim milk works in a pinch, but whole gives that rich tenderness we’re after.
- 2¼ tsp instant yeast: My little miracle workers. If you only have active dry, proof it first in the warm milk with sugar.
- 2 Tbsp sugar, divided: Just enough to feed the yeast and balance flavors – don’t skip it!
- 1 large egg: Room temp is best – gives structure without making rolls tough.
- ¼ cup (4 Tbsp) butter: Real, unsalted, softened butter – none of that margarine nonsense. It should dent when pressed.
- 1 tsp salt: Trust me, without this your rolls will taste flat as cardboard.
- 3 cups flour: Spooned and leveled! Bread flour makes chewier rolls, all-purpose gives softer texture.
- 1½ cups shredded sharp cheddar: Freshly grated melts better than pre-shredded.
- 2 garlic cloves, minced: Or ½ tsp garlic powder if you’re in a hurry.
See? Nothing too fancy – just good, honest ingredients handled with care. Now let’s get mixing!
Equipment You’ll Need
Don’t worry – you don’t need fancy gadgets to make these rolls shine! Here’s what I always grab from my trusty kitchen arsenal:
- Stand mixer with dough hook (or strong arms and a wooden spoon!)
- 9×13 inch baking pan – or two 9-inch rounds if you prefer smaller batches
- Measuring cups & spoons – eyeballing flour is a rookie mistake!
- Rubber spatula for scraping every bit of that glorious dough
- Pastry brush – for that final buttery glow-up
That’s it! Now let’s get those hands floury.
How to Make Cheddar Garlic Dinner Rolls
Alright, let’s roll up our sleeves and make some magic happen! I’ll walk you through each step just like I did with my granddaughter last Christmas – complete with all my little tricks for perfect rolls every time.

Preparing the Dough
First things first – that yeast needs waking up! Pour your warmed milk (remember – warm like a bath, not hot!) into your mixer bowl and sprinkle in the yeast with 1 tablespoon of sugar. Give it a gentle whisk, then walk away for 5 minutes. You’ll know it’s ready when it looks foamy like a little cappuccino.
Now add the remaining sugar, egg, softened butter (in pieces!), salt, and 1 cup of flour. Mix on low until it just comes together – about 30 seconds. Scrape down those sides! Then add the rest of the flour gradually while mixing. Keep going until the dough starts pulling away from the bowl’s sides – about 2 minutes of mixing should do it.
Here’s where the magic happens – knead that dough for a good 5 minutes in the mixer (or 8-10 by hand). You’ll know it’s ready when it’s smooth, slightly sticky, and springs back when poked. Pop it into a greased bowl, cover with a clean towel, and let it rise somewhere cozy until doubled – usually 1-2 hours depending on your kitchen’s warmth.
Shaping and Second Rise
Punch down that puffy dough (so satisfying!) and turn it onto a lightly floured surface. Divide into 14-16 equal pieces – I use a bench scraper for neat portions. Roll each piece into a smooth ball between your palms, tucking the edges underneath for that perfect roll shape.
Arrange them in your greased pan with about ½ inch between each – they’ll grow into each other beautifully as they rise. Cover loosely with plastic wrap or that trusty towel again and let them puff up for another hour. They’re ready when they look pillowy and have nearly filled the pan.
Baking the Rolls
Preheat your oven to 350°F (177°C) with a rack in the lower third – this prevents over-browning on top. When those rolls look like they can’t possibly get any puffier (but before they start deflating), pop them in the oven.
Bake for 20-25 minutes, rotating the pan halfway through for even color. You’ll know they’re done when they’re golden brown all over and sound hollow when tapped on top. Oh, and that smell? Pure heaven!
Brush them with honey butter right out of the oven if you’re feeling fancy – the rolls will drink it right up. Let them cool just enough so you don’t burn your fingers, then dig in while they’re still warm and gooey!
Print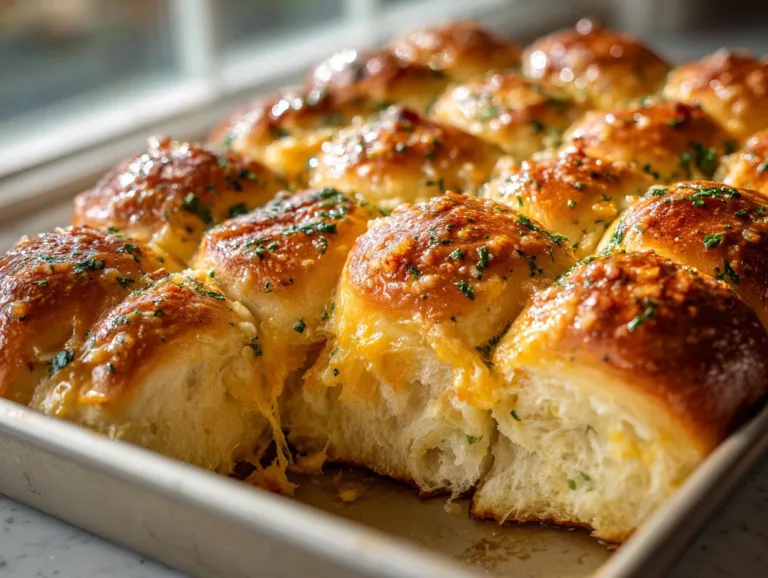
Perfect Cheddar Garlic Dinner Rolls Your Family Will Crave
Soft and fluffy Cheddar Garlic Dinner Rolls with a buttery, cheesy flavor, perfect for any meal.
- Total Time: 2 hours 55 minutes (includes rising)
- Yield: 14–16 rolls 1x
Ingredients
- 1 cup (240ml) whole milk, warmed to about 110°F (43°C)
- 2 and 1/4 teaspoons instant yeast (1 standard packet)
- 2 Tablespoons granulated sugar, divided
- 1 large egg
- 1/4 cup (4 Tbsp; 56g) unsalted butter, softened to room temperature and cut into 4 pieces
- 1 teaspoon salt
- 3 cups (390g) all-purpose flour or bread flour (spooned & leveled)
- optional topping: 2 Tablespoons (28g) melted unsalted butter mixed with 1 Tablespoon honey
Instructions
- Prepare the dough: Whisk warm milk, yeast, and 1 Tablespoon sugar in a stand mixer bowl. Cover and let sit for 5 minutes.
- Add remaining sugar, egg, butter, salt, and 1 cup flour. Mix on low for 30 seconds, scrape bowl, then add remaining flour. Beat until dough pulls away from sides, about 2 minutes.
- Knead dough in mixer for 5 minutes or by hand on a floured surface. Dough should be soft and slightly sticky.
- 1st Rise: Place dough in a greased bowl, cover, and let rise until doubled, 1-2 hours.
- Grease a 9×13 inch baking pan or two 9-inch pans.
- Shape the rolls: Punch down dough, divide into 14-16 pieces, shape into balls, and arrange in pan.
- 2nd Rise: Cover rolls and let rise until puffy, about 1 hour.
- Preheat oven to 350°F (177°C) on a lower rack.
- Bake rolls for 20-25 minutes until golden brown, rotating pan halfway. Brush with honey butter if desired.
- Serve warm or store leftovers tightly covered at room temperature for 2-3 days.
Notes
- Use bread flour for a chewier texture.
- If dough is too sticky, add flour 1 Tablespoon at a time.
- For faster rising, place dough in a warm spot.
- Freeze unbaked rolls for later use.
- Prep Time: 30 minutes
- Cook Time: 25 minutes
- Category: Bread
- Method: Baking
- Cuisine: American
- Diet: Vegetarian
Nutrition
- Serving Size: 1 roll
- Calories: 180
- Sugar: 4g
- Sodium: 150mg
- Fat: 6g
- Saturated Fat: 3.5g
- Unsaturated Fat: 2g
- Trans Fat: 0g
- Carbohydrates: 27g
- Fiber: 1g
- Protein: 5g
- Cholesterol: 30mg
Tips for Perfect Cheddar Garlic Dinner Rolls
After decades of making these rolls (and plenty of trial and error!), I’ve picked up some tricks that’ll save you headaches:
- Sticky dough? Don’t panic! Add flour 1 tablespoon at a time until it just pulls away from the bowl. Too much flour makes tough rolls.
- Slow riser? Put your dough in the oven with just the light on – creates the perfect cozy environment. Or place it near (not on!) a warm stove.
- Short on time? Let dough rise in the fridge overnight. It’ll develop amazing flavor and be ready to shape in the morning.
- Freezing? Shape the rolls, freeze them unbaked on a tray, then transfer to a bag once solid. Bake straight from frozen – just add 5 extra minutes.
- Cheese sticking? Toss shredded cheddar with 1 tsp flour before mixing in – prevents clumping!
Remember – baking’s supposed to be fun! Even “mistakes” usually taste delicious.
Serving Suggestions for Cheddar Garlic Dinner Rolls
Oh honey, these rolls aren’t just for dinner – they’re the life of every meal! My family goes wild when I serve them warm with a pat of butter melting into all those cheesy layers. They’re absolute perfection alongside creamy tomato soup on chilly nights – we call it “grown-up grilled cheese.”
Come holiday time? These beauties steal the show at Thanksgiving (right next to the turkey) and Christmas brunch (toasted with jam – don’t knock it till you try it!). My grandkids even beg for them as after-school snacks – split open and stuffed with deli ham when I’m feeling fancy. Honestly? They rarely last long enough to make it to the table!
Storing and Reheating Cheddar Garlic Dinner Rolls
Now listen close – these rolls disappear fast in my house, but when you’ve got leftovers (a rare occasion!), here’s how to keep ’em tasting fresh:
At room temp, they’ll stay soft for 2-3 days in an airtight container or ziplock bag. For longer storage, freeze ’em! I wrap cooled rolls individually in foil, then toss ’em in a freezer bag for up to 3 months. To reheat, pop frozen rolls straight into a 350°F oven for 10-12 minutes – they’ll taste just-baked!
My secret? A quick 10-second zap in the microwave makes day-old rolls soft again, but for that fresh-from-the-oven magic, nothing beats a quick oven warm-up. Just watch ’em carefully – they go from warm to overdone in a blink!
Nutritional Information
Now, I’m no nutritionist, but here’s the scoop on what’s in these heavenly rolls – because let’s face it, sometimes we just gotta know! Keep in mind these are estimates (my generous butter brushing might tip the scales a bit!). Per roll, you’re looking at:
- 180 calories – mostly from that good, wholesome energy
- 5g protein – thanks to the milk, egg, and flour
- 27g carbs – perfect for soaking up soups and stews
- 6g fat – because butter and cheese make life worth living
Remember, your exact numbers might dance around a bit depending on your ingredients. But honestly? When you’re biting into one of these warm, cheesy clouds, numbers are the last thing on your mind!
FAQs About Cheddar Garlic Dinner Rolls
Can I use active dry yeast instead of instant?
Absolutely! Just proof it first – mix the active dry yeast with the warm milk and 1 Tbsp sugar, then wait 5-10 minutes until foamy before adding other ingredients. It’ll take a tad longer to rise, but works like a charm.
My dough is too sticky – what did I do wrong?
Don’t worry, honey! Humidity affects dough. Just add flour 1 Tbsp at a time while kneading until it barely stops sticking to your fingers. Too much flour makes tough rolls, so go slow – sticky dough means soft rolls!
Can I freeze these rolls?
You bet! I freeze them two ways: baked (cool completely, wrap tightly in foil) or unbaked (shape the rolls, freeze on a tray, then bag once solid). Bake frozen rolls at 350°F adding 5 extra minutes – they’ll taste fresh!
Why didn’t my rolls rise properly?
Three likely culprits: old yeast (check expiration dates!), milk that was too hot (it should feel warm, not hot, to your wrist), or a chilly kitchen. Next time, let dough rise in the oven with just the light on for cozy warmth.
Can I make these ahead for Thanksgiving?
My holiday secret! Make dough up to 2 days ahead – after first rise, punch it down, cover tightly, and refrigerate. On turkey day, shape rolls, let rise, and bake. The slow rise develops amazing flavor!
Well, there you have it, my dear – all my secrets for perfect Cheddar Garlic Dinner Rolls laid out just for you! I can’t wait for you to experience that first heavenly bite of warm, cheesy goodness straight from your own oven. Trust me, once you make these, they’ll become your new family tradition too.
Now don’t be shy – give this recipe a whirl and let me know how it turns out! Snap a photo of your golden rolls (I know they’ll be gorgeous) and share it with me. There’s nothing I love more than hearing how my recipes bring joy to other kitchens. And if your family gobbles them up as fast as mine does? Well, you’ll just have to make another batch!
Happy baking, and remember – the best meals are made with love (and maybe a little extra cheese). Now get in that kitchen and start creating some delicious memories!
For More recipes, Follow me on Facebook!






