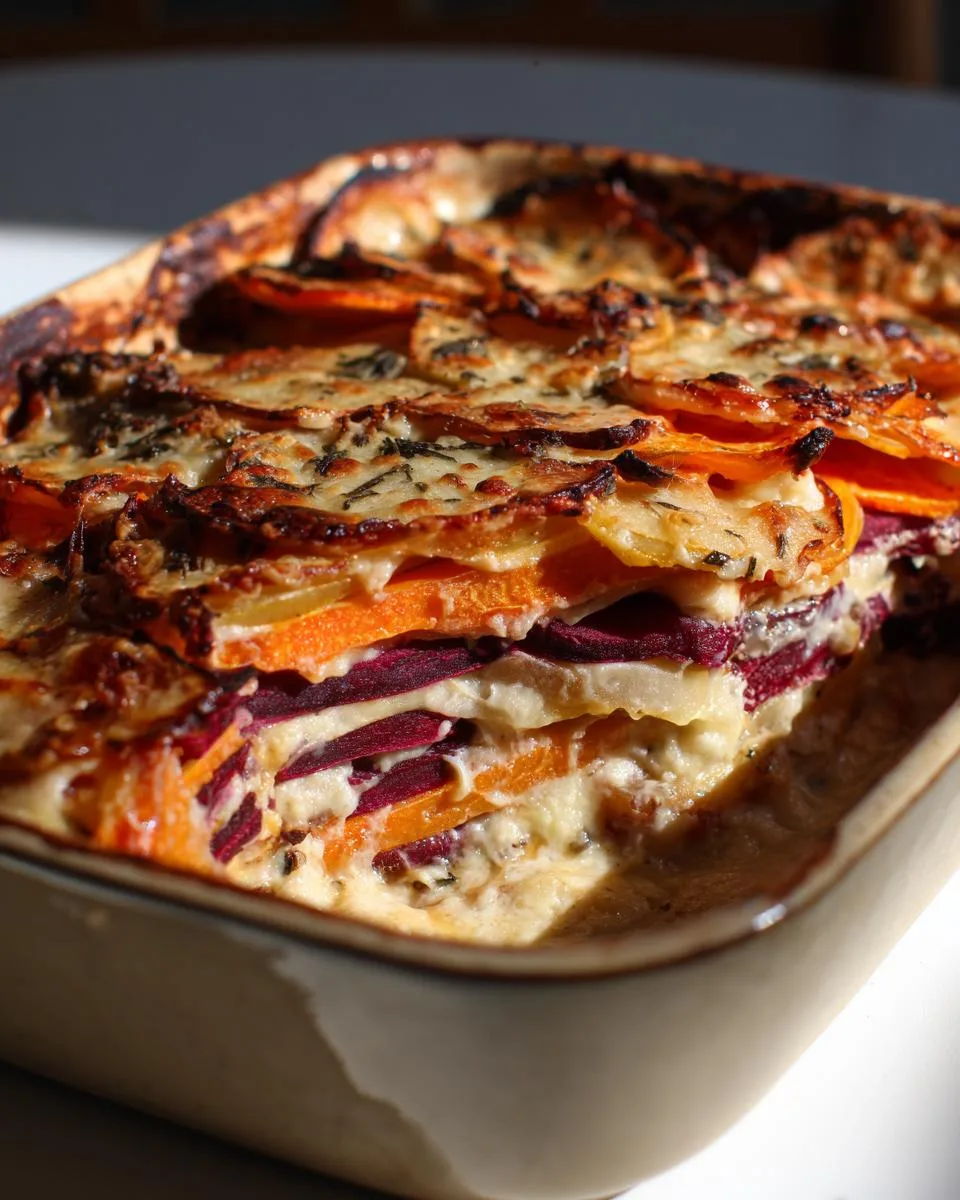
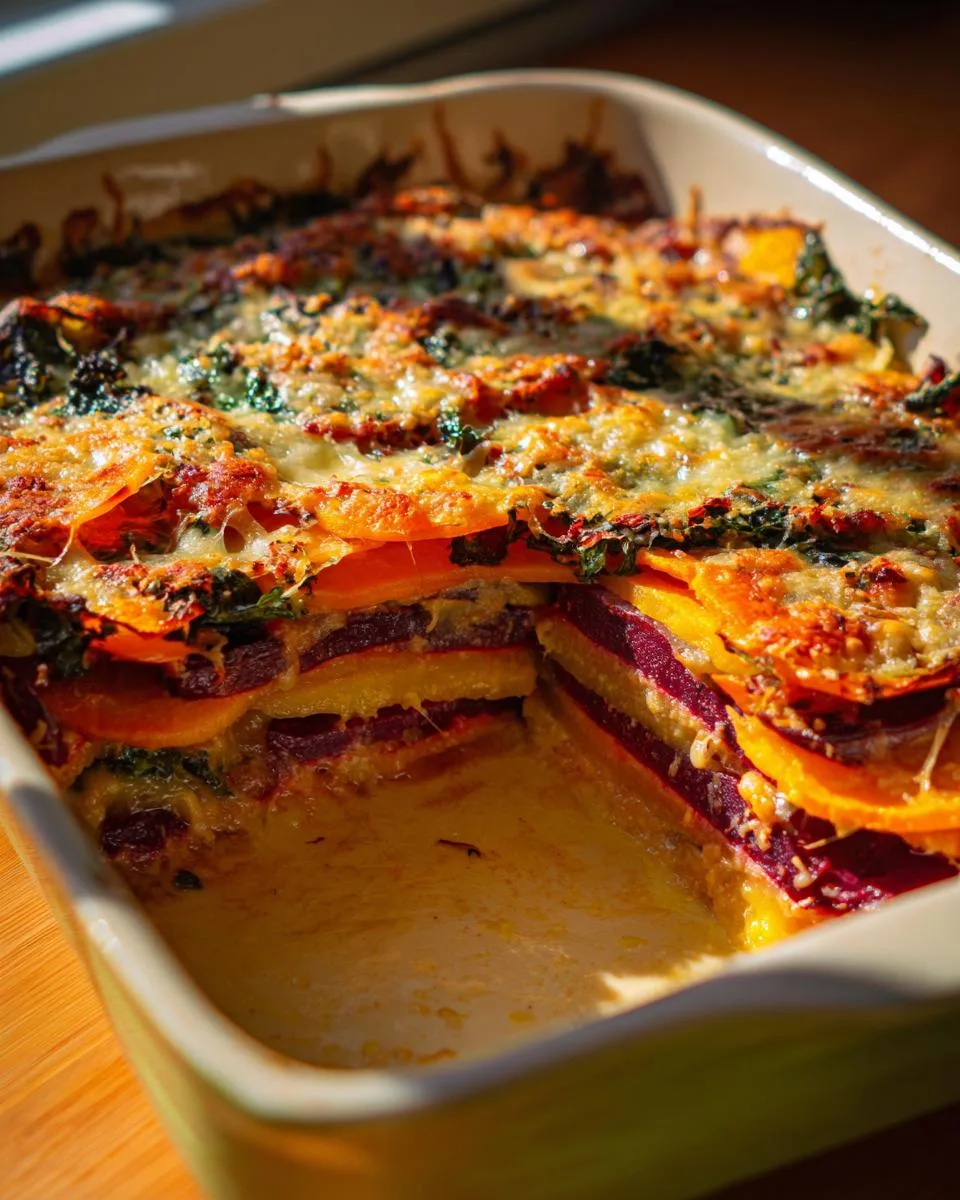
There’s something about a bubbling, cheesy gratin that feels like a warm hug on a chilly evening. My Cheesy Root Vegetable Gratin has been a star at our family dinners for years, and it’s not hard to see why. Layers of sweet potatoes, parsnips, and beets—each kissed with cream and a generous sprinkle of Parmesan and gruyere—create a dish that’s as comforting as it is colorful. I remember the first time I served it to my grandkids; they were skeptical about the beets, but one bite had them coming back for seconds. It’s proof that even the pickiest eaters can’t resist the magic of melted cheese and tender veggies. This gratin is the kind of dish that brings everyone to the table, and I guarantee it’ll do the same for you.
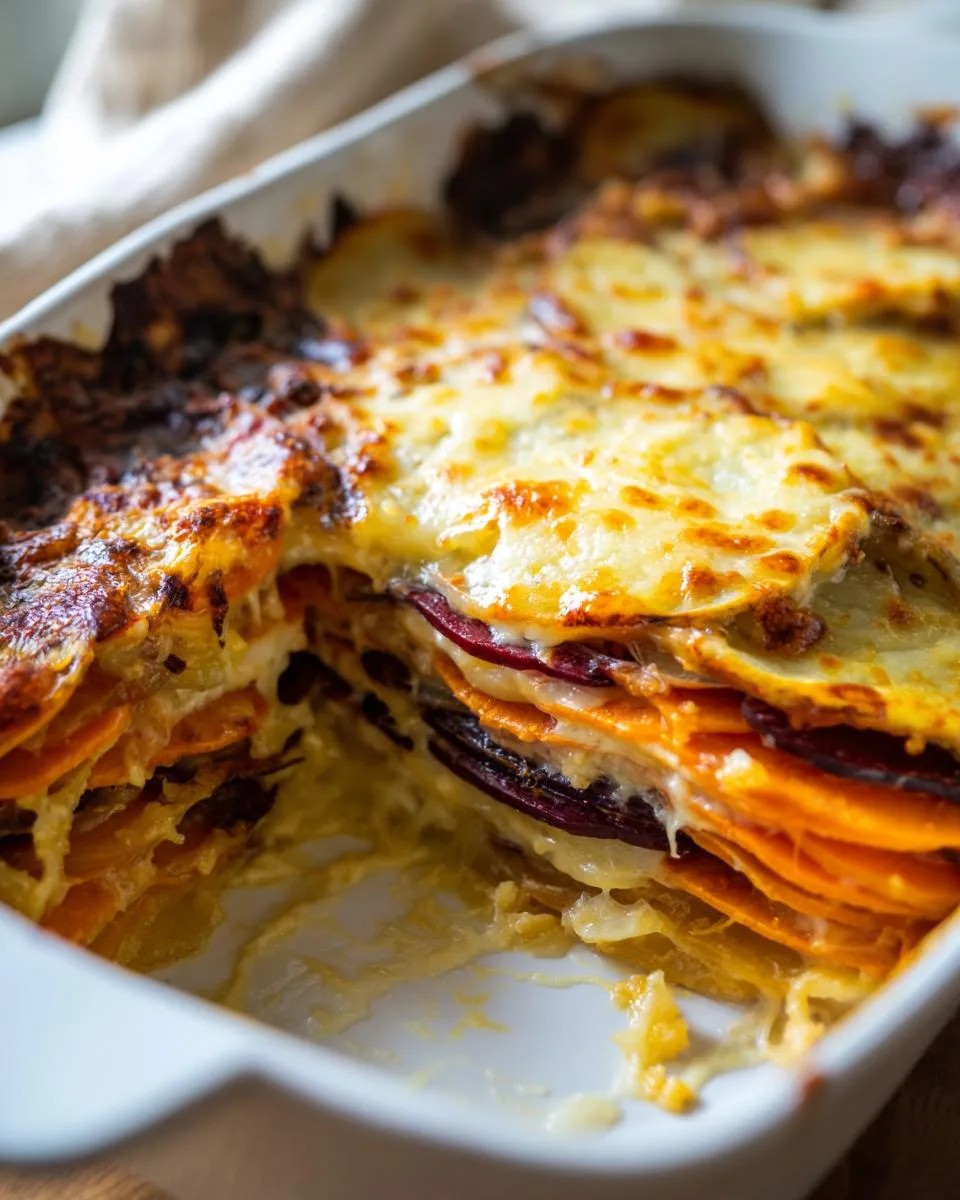
Table of Contents
Table of Contents
Why You’ll Love This Cheesy Root Vegetable Gratin
This gratin is the ultimate comfort food, and trust me, it’s got everything you’ll want in a side dish. Here’s why it’s a winner:
- Creamy and dreamy: The heavy cream and melty cheeses create a luscious, velvety texture that coats every bite.
- Hearty and wholesome: Sweet potatoes, parsnips, and beets bring earthy flavors and a satisfying heartiness that’s perfect for chilly nights.
- Easy to make: Just slice, layer, and bake—it’s simple enough for weeknights but fancy enough for holidays.
- Visually stunning: The vibrant colors of the root vegetables make this a beautiful centerpiece.
Ingredients for Cheesy Root Vegetable Gratin
Gathering the right ingredients is half the battle—and trust me, you don’t want to skimp here. Every element plays a role in creating that perfect, cozy bite. Here’s what you’ll need:
- 1 tablespoon unsalted butter, softened (for greasing the dish—don’t even think about skipping this step, or those veggies will stick!)
- 1-2 long sweet potatoes (about 2 inches thick), peeled and thinly sliced (I like to use a mandoline for paper-thin rounds—it makes all the difference)
- 3-4 large parsnips, ends trimmed, peeled, and thinly sliced (look for firm, creamy-white ones without any woody spots)
- 3-5 small beets, peeled and thinly sliced (the ruby-red color makes this dish pop—just wear gloves unless you want pink fingers!)
- 14 tablespoons heavy cream, divided (yes, you read that right—this is comfort food, after all)
- 4 ounces grated Parmesan, divided (about 1 cup packed—buy a block and grate it fresh for the best flavor)
- 1 tablespoon fresh minced thyme, divided, plus more for garnish (dried thyme works in a pinch, but fresh is worth it)
- 1 garlic clove, minced (just one—we’re not making garlic bread here)
- 1 ounce shredded gruyere (that nutty, melty goodness is the crowning glory)
- Salt and pepper to taste (don’t be shy—root vegetables need a good seasoning)
Pro tip: Measure everything before you start slicing. There’s nothing worse than realizing mid-recipe that you’re short on cream or cheese. (Trust me, I’ve been there—cue the frantic fridge search!)
Equipment You’ll Need
This gratin comes together with just a few trusty tools—nothing fancy, but each one makes a big difference. Here’s what I always grab:
- Mandoline: A game-changer for getting those veggies paper-thin and even. (Watch your fingers—I speak from experience!)
- 3-quart baking dish: A classic 9×13-inch works, but I love a deeper dish for taller, more impressive layers.
- Mixing bowls: Three small ones for tossing each veggie with its creamy coating.
- Pastry brush (optional): For buttering the dish—though my fingers do the job just fine in a pinch.
That’s it! No special gadgets needed—just good old-fashioned tools that’ll make your life easier. Now, let’s get slicing!
Ingredient Substitutions
Life happens—sometimes you’re out of gruyere or realize too late that you used the last of the heavy cream for your morning coffee. No panic! Here are my go-to swaps that keep this gratin delicious (with a few texture tweaks):
- Whole milk for cream: Use 1:1, but expect a slightly less velvety result—it’ll still taste great.
- Cheddar or fontina for gruyere: Both melt beautifully, though cheddar gives a sharper kick.
- Pecorino Romano for Parmesan: Saltier, so taste as you go.
- Parsley for thyme: Different vibe, but still fresh and herby.
Just remember: swaps change the dish’s personality a bit—like wearing boots instead of heels. Still fabulous, just a different kind of fabulous.
How to Make Cheesy Root Vegetable Gratin
Now for the fun part—bringing all those gorgeous ingredients together! This gratin comes together in simple steps, but the magic is in the details. Follow along, and you’ll have a dish that’s as beautiful as it is delicious.

Prep the Vegetables
First things first—let’s get those veggies ready for their cheesy debut. The key here is uniform slices. I can’t stress this enough—if some pieces are thick and others thin, they won’t cook evenly. That’s where my trusty mandoline earns its keep.
I slice the sweet potatoes, parsnips, and beets into rounds about 1/8-inch thick (think the thickness of two stacked quarters). The beets will stain everything pink—including your hands—so I usually wear gloves unless I’m feeling adventurous.
Here’s my little trick: I keep each vegetable in its own bowl and coat them separately. Pour 4 tablespoons of cream over the sweet potatoes and parsnips, and 2 tablespoons over the beets (they don’t need as much). Then, sprinkle each bowl with ½ ounce Parmesan and 1 teaspoon thyme. A pinch of salt and pepper in each, then gently toss until every slice is lightly dressed. This ensures every bite is perfectly seasoned.
Layer and Bake
Now, the real artistry begins—layering! First, grease that baking dish well with butter (every nook and cranny). Pour the remaining ¼ cup cream into the bottom and sprinkle with ½ ounce Parmesan and the minced garlic. This creates a flavorful “bed” for your veggies.
Here’s where it gets pretty: Start standing the vegetable slices upright in alternating rows—sweet potato, parsnip, beet—pressing them snugly together like dominoes. They should be tight enough to support each other but not so crammed that they won’t cook through. The colors will look stunning already!
Once all your veggies are standing proud, season the top with salt, pepper, and the remaining Parmesan. Cover the dish tightly with foil—this steams the veggies so they soften beautifully. Bake at 400°F for 30 minutes.
Now, the grand finale: Remove the foil, sprinkle the shredded gruyere over the top, and bake uncovered for another 18-20 minutes. You’ll know it’s done when the cheese is golden and bubbly, and the veggies are tender when pierced with a knife. A little browning on the edges? That’s flavor, my friend.
Let it rest for 5 minutes—I know it’s hard to wait, but this helps the layers set. Then, garnish with fresh thyme and watch everyone’s eyes light up when you bring it to the table.
Print
Creamy 3-Layer Cheesy Root Vegetable Gratin Recipe
A comforting and creamy root vegetable gratin with sweet potatoes, parsnips, and beets layered with Parmesan and gruyere cheese.
- Total Time: 1 hour 10 minutes
- Yield: 6 servings 1x
Ingredients
- 1 tablespoon unsalted butter, softened
- 1–2 long sweet potatoes (about 2 inches thick), peeled
- 3–4 large parsnips, ends trimmed and peeled
- 3–5 small beets, peeled
- 14 tablespoons heavy cream, divided
- 4 ounces grated Parmesan, divided
- 1 tablespoon fresh minced thyme, divided, plus more for garnish
- 1 garlic clove, minced
- 1 ounce shredded gruyere
- Salt and pepper to taste
Instructions
- Preheat oven to 400°F. Grease a 3-quart baking dish with butter.
- Slice sweet potatoes, parsnips, and beets into thin rounds and place each in separate bowls.
- Pour 4 tablespoons cream over sweet potatoes and parsnips, and 2 tablespoons over beets. Add ½ ounce Parmesan and 1 teaspoon thyme to each bowl. Season with salt and pepper, then toss to coat.
- Pour remaining ¼ cup cream into the baking dish. Sprinkle with ½ ounce Parmesan and minced garlic.
- Arrange vegetable slices in alternating rows (sweet potatoes, parsnips, beets) standing upright.
- Season the top with salt, pepper, and remaining Parmesan.
- Cover with foil and bake for 30 minutes until vegetables soften.
- Uncover, top with gruyere, and bake another 18-20 minutes until golden and tender.
- Garnish with fresh thyme before serving.
Notes
- Use a mandoline for even, thin slices.
- Whole milk can replace heavy cream, but the gratin will be less creamy.
- Let rest for 5 minutes before serving for easier slicing.
- Prep Time: 20 minutes
- Cook Time: 50 minutes
- Category: Side Dish
- Method: Baking
- Cuisine: American
- Diet: Vegetarian
Nutrition
- Serving Size: 1 serving
- Calories: 320
- Sugar: 8g
- Sodium: 280mg
- Fat: 22g
- Saturated Fat: 14g
- Unsaturated Fat: 6g
- Trans Fat: 0g
- Carbohydrates: 24g
- Fiber: 5g
- Protein: 9g
- Cholesterol: 65mg
Tips for the Perfect Cheesy Root Vegetable Gratin
After decades of making this gratin, I’ve picked up a few tricks that take it from good to “can I have the recipe?” status. Here’s how to nail it every time:
- Mandoline magic: If you don’t have one, borrow or buy one—it’s worth it! Uneven slices mean uneven cooking, and nobody wants a crunchy parsnip next to a mushy beet. (Safety tip: Use the guard or a kitchen towel to protect your fingers. I learned this the hard way!)
- Rest and relax: Let the gratin sit for 5 minutes after baking. I know it’s tempting to dive in, but this lets the cream settle so your beautiful layers don’t collapse when sliced.
- Cheese swaps: No gruyere? Try sharp cheddar or fontina. Out of Parmesan? Pecorino works in a pinch. Just avoid pre-shredded bags—they don’t melt as smoothly.
- Golden rule: If the top isn’t bubbly and browned by the end, broil it for 1-2 minutes. That extra crisp is pure heaven.
Little things make big differences—trust me, your tastebuds will thank you!
Serving Suggestions
This gratin is the ultimate team player—it pairs beautifully with almost anything! For a classic Sunday supper, serve it alongside a rosemary-roasted chicken or garlic-rubbed pork loin. If you’re going meatless, a crisp arugula salad with lemon vinaigrette balances the richness perfectly. Right before serving, I love scattering extra fresh thyme over the top—those little green leaves make it look as gorgeous as it tastes. And don’t forget the crusty bread for soaking up every last bit of that creamy, cheesy goodness!
Storing and Reheating Cheesy Root Vegetable Gratin
Got leftovers? Lucky you! This gratin keeps like a dream. Let it cool completely, then cover tightly and refrigerate for up to 3 days. For longer storage, freeze individual portions wrapped in foil (they’ll last 2 months). To reheat, pop it in a 350°F oven until warmed through—about 20 minutes for fridge-cold slices, 30-40 if frozen. The microwave works in a pinch, but the oven brings back that crispy-cheesy top we all love. Pro tip: Add a splash of cream before reheating to keep it extra luscious!
Cheesy Root Vegetable Gratin FAQs
Over the years, I’ve gotten so many questions about this gratin—and I love that! Here are the ones that come up most often, with all my tried-and-true answers:
Can I make this ahead of time?
Absolutely! Assemble it up to a day in advance (just hold off on baking), cover tightly, and refrigerate. Add 5-10 extra minutes to the baking time since it’ll be cold. Perfect for holiday meal prep!
How thin should I slice the vegetables?
Think “potato chip thin”—about 1/8-inch thick. Any thicker, and they won’t soften properly; any thinner, and they might disappear into the cream. My mandoline’s #3 setting is just right.
Can I use different root vegetables?
Of course! Try turnips, rutabaga, or even celery root. Just keep the slices uniform, and remember: harder veggies (like carrots) need thinner slices than softer ones (like potatoes).
Why do the veggies need to stand upright?
Two reasons: First, it looks stunning (like a veggie mosaic!). Second, standing them up lets the cream seep between every layer while keeping the texture perfect—no mushiness.
My gratin turned out watery—what went wrong?
Likely the beets—they release more liquid. Next time, pat them dry after slicing or reduce their cream by 1 tablespoon. Also, let the baked gratin rest before serving; those juices get reabsorbed as it cools slightly.
Nutritional Information
Now, I’m no nutritionist—just a grandma who believes in balance (and cheese in moderation… mostly). These numbers are estimates based on my exact ingredients, so keep in mind your results might dance a little depending on brands and tweaks. Here’s the scoop per serving:
- Calories: 320
- Fat: 22g (14g saturated—that’s the cream and cheese doing their thing)
- Carbohydrates: 24g
- Fiber: 5g (thank you, root veggies!)
- Protein: 9g
- Sodium: 280mg
It’s rich, sure—but those vibrant vegetables pack vitamins A and C, plus a good dose of potassium. My philosophy? Enjoy every cheesy bite knowing you’re getting real, wholesome ingredients. After all, food’s meant to nourish and delight!
I’d love to hear how your Cheesy Root Vegetable Gratin turns out! Did your family gobble it up like mine always does? Maybe you put your own spin on it—I’m all for kitchen creativity. Leave a note in the comments below telling me your experience. Was the gruyere perfectly golden? Did you sneak in an extra veggie? (I won’t tell!) And if you loved it as much as we do, be sure to rate the recipe—nothing makes this grandma happier than knowing her recipes are bringing joy to other tables. Now, who’s ready for seconds?
For More recipes, Follow me on Facebook!