
You know those mornings when the whole house smells like comfort and everyone gathers around the table before the sun’s fully up? That’s what my farmer breakfast casserole brings to the table—literally! For fifty years, I’ve been making this hearty dish for hungry farmhands, sleepy grandkids, and every cousin who ever crashed at my place after holiday gatherings.

Table of Contents
Table of Contents
There’s magic in how simple ingredients—eggs, potatoes, good sharp cheddar—transform into something that feels like a warm hug on a plate. What makes it special? You probably have everything in your fridge right now, and it comes together faster than you can brew a pot of coffee. Just wait till you see how the evaporated milk makes every bite creamy without being heavy. Trust me, once this casserole becomes your go-to brunch dish, you’ll understand why three generations of my family swear by it.
Why You’ll Love This Farmer Breakfast Casserole
Oh honey, let me count the ways this casserole steals hearts at the breakfast table! I’ve watched it win over picky eaters, sleepy teenagers, and even my famously food-snob brother-in-law. Here’s what makes it so darn lovable:
- Prep couldn’t be simpler – Just layer, pour, and bake. I’ve made this half-asleep when the rooster hadn’t even crowed yet!
- Adapts to whatever’s in your fridge – Out of ham? Bacon works. Don’t like onions? Toss in bell peppers instead. This recipe forgives.
- Feeds a crowd without fuss – Perfect for Sunday brunches, holiday mornings, or when the whole soccer team sleeps over.
- Tastes even better reheated – The flavors settle in overnight like good friends settling into my porch swing.
Honestly, the best part? Watching folks scrape their plates clean while asking for “just one more bite.” That’s when I know I’ve done Grandma Jo proud.
Ingredients for Farmer Breakfast Casserole
Now, don’t you go thinking fancy ingredients make this casserole special—it’s all about using what you’ve got wisely! Here’s exactly what you’ll need, measured with love (and my trusty old Pyrex cups):

- 3 cups frozen hash brown potatoes – Thawed overnight in the fridge, not those icy little bricks straight from the freezer!
- 1 cup cooked ham – Diced into cheerful little cubes, about the size of your pinky nail
- ½ cup green onions – Sliced thin (about 4 stalks), both the white and green parts for color
- 1 cup shredded cheddar cheese – Sharp or mild, but shred it yourself—those pre-shredded bags don’t melt right
- 4 large eggs – Straight from the fridge is fine, but room temp blends smoother
- 1 (12 oz) can evaporated milk – That’s 1 ½ cups—not sweetened condensed milk! (We’ll talk about this later)
- ¼ teaspoon black pepper – Freshly cracked if you’re feeling fancy
- ¼ teaspoon salt – I use kosher, but table salt works too
- ¼ teaspoon dried mustard – Optional, but adds a nice little kick that makes folks wonder “what’s that delicious secret?”
Ingredient Notes & Substitutions
Listen here—recipes are guidelines, not prison sentences! Here’s how to make this casserole your own:
- Ham alternatives: Turkey bacon works beautifully (cook it crisp first), or skip meat altogether for a veggie version
- Potato panic? Fresh grated russets (squeezed dry!) can sub for frozen hash browns in a pinch
- Cheese swaps: Monterey Jack melts like a dream, or use dairy-free shreds if needed
- Milk mishaps: Whole milk + 1 tablespoon flour can replace evaporated milk—but it won’t be quite as rich
- Veggie boost: Toss in diced bell peppers or mushrooms if you’re feeling virtuous
My one firm rule? Never use sweetened condensed milk—your casserole will taste like dessert gone wrong! (Ask me how I know…)
How to Make Farmer Breakfast Casserole
Alright, let’s get this show on the road! Making my farmer breakfast casserole is as easy as pie—easier actually, since we’re not messing with crusts. Just follow these steps, and you’ll have golden, bubbly perfection in no time:

- Fire up that oven – Preheat to 350°F (175°C) while you prep. No peeking—let it get properly hot! Lightly grease your favorite 2-quart baking dish with butter or cooking spray. (I use my speckled blue enamel one—it’s seen more breakfasts than I can count!)
- Layer like you mean it – Spread those thawed hash browns evenly across the bottom. They’re the foundation, so pat them down gently. Next comes the ham—scatter it like you’re feeding chickens. Sprinkle those green onions over top like confetti, then shower everything with cheese. (No skimping—cheese is the glue that holds this masterpiece together!)
- Whisk with gusto – In a medium bowl, beat those eggs like they owe you money! Add the evaporated milk, pepper, salt, and that sneaky dried mustard if you’re using it. Whisk until it’s all friendly and combined—no streaks allowed!
- The big pour – Slowly drizzle your egg mixture over the layered ingredients. I go in a spiral pattern from the outside in—this helps everything get evenly soaked without disturbing your beautiful layers.
- Bake to golden glory – Pop it in the oven uncovered for 50-60 minutes. You’ll know it’s done when the edges are crispy-brown, the center doesn’t jiggle when nudged, and a knife inserted near the center comes out clean. (If it looks done at 50 minutes, trust your instincts!)
- The hardest part – Let it rest for 5-10 minutes before slicing. I know, I know—the smell will drive you wild, but this patience pays off in neat slices that hold together.
Pro Tips for the Best Farmer Breakfast Casserole
After sixty years of making this casserole (and a few memorable flops), here’s what I’ve learned:
- Thaw those taters! Frozen hash browns will make your bake time wonky. Leave them in the fridge overnight, or spread them on a towel to thaw faster.
- Cheese matters – Shred your own cheese! Those pre-shredded bags have anti-caking agents that make melting sluggish. Extra credit: toss your cheese with 1 tsp flour to prevent clumping.
- The rest is best – Letting the casserole sit after baking isn’t just about neat slices—it lets the eggs set fully and flavors marry. Think of it as a little post-oven honeymoon!
- Pan panic? If your oven runs hot, tent with foil at 40 minutes to prevent over-browning. Glass pans bake faster than metal—check 5 minutes early.
Remember, even if it comes out looking a little lopsided (my 1978 Thanksgiving casserole looked like the Leaning Tower of Pisa!), it’ll still taste like home. That’s the beauty of comfort food!
Print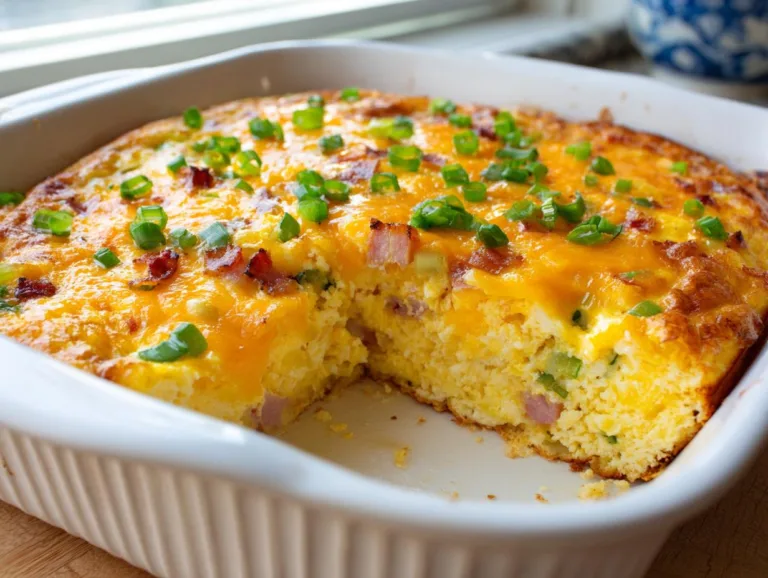
Grandma’s Heartwarming Farmer Breakfast Casserole for 8
A hearty and comforting farmer breakfast casserole perfect for a family meal or brunch.
- Total Time: 1 hour 10 minutes
- Yield: 6 servings 1x
Ingredients
- 3 cups frozen hash brown potatoes (thawed)
- 1 cup cooked ham (diced)
- ½ cup green onions (sliced, about 4)
- 1 cup shredded cheddar cheese
- 4 large eggs
- 1 12 oz can evaporated milk (1 ½ cups)
- ¼ teaspoon black pepper
- ¼ teaspoon salt
- ¼ teaspoon dried mustard (optional, for extra flavor)
Instructions
- Preheat your oven to 350°F (175°C). Lightly grease a 2-quart baking dish.
- Spread thawed hash browns evenly in the prepared dish. Top with ham, green onions, and shredded cheese.
- In a medium bowl, whisk together eggs, evaporated milk, pepper, salt, and dried mustard (if using).
- Slowly pour the egg mixture evenly over the potato and ham mixture in the dish.
- Place in oven uncovered and bake for 50–60 minutes, or until a knife inserted near the center comes out clean.
- Let casserole rest for 5–10 minutes before slicing. Serve warm.
Notes
- Thaw the hash browns completely for even cooking.
- Customize with your favorite vegetables or cheese.
- Can be prepared ahead and refrigerated overnight before baking.
- Prep Time: 15 minutes
- Cook Time: 55 minutes
- Category: Breakfast
- Method: Baking
- Cuisine: American
- Diet: Low Lactose
Nutrition
- Serving Size: 1 slice
- Calories: 320
- Sugar: 4g
- Sodium: 580mg
- Fat: 18g
- Saturated Fat: 8g
- Unsaturated Fat: 7g
- Trans Fat: 0g
- Carbohydrates: 22g
- Fiber: 2g
- Protein: 18g
- Cholesterol: 170mg
Serving Suggestions for Farmer Breakfast Casserole
Now that you’ve got this golden beauty out of the oven, let’s talk about how to make it shine at the table! Over the years, I’ve found these pairings turn a simple casserole into a full-blown feast:
- Fresh fruit salad – The bright, juicy flavors cut through the richness perfectly. My grandkids love when I arrange berries in little flower shapes around the platter.
- Crusty bread or biscuits – Nothing beats tearing into warm buttermilk biscuits to sop up every last cheesy bite. Store-bought is fine—we won’t tell!
- Hot sauce or salsa – For those who like a kick, I always set out my homemade pepper relish (secret ingredient: a dash of apple cider vinegar).
- Simple greens – A quick arugula salad with lemon dressing makes you feel virtuous before diving into seconds.
Here’s my favorite way to serve it: Slice that casserole into generous squares right at the table while it’s still steaming. Watch everyone’s eyes light up as the cheese pulls apart in long, gooey strings. Pass around the toppings—let folks customize their plates however they like. That’s the beauty of this dish—it plays well with others!
Oh, and coffee! Always have plenty of strong coffee brewing. Trust me, after two helpings of this casserole, your guests will need the caffeine boost to move from the table to the couch for their post-brunch nap.
Storage & Reheating Instructions
Now listen close—this casserole might disappear fast at breakfast, but if you’re lucky enough to have leftovers (or smart enough to make two!), here’s how to keep them tasting fresh as a daisy:
- Fridge storage: Cool completely, then cover tightly with foil or transfer to an airtight container. It’ll keep beautifully for 3-4 days. Pro tip—slice before storing so you can grab single servings easily!
- Freezer magic: Wrap individual portions in foil, then pop them in a freezer bag for up to 2 months. Write the date with a Sharpie—future you will be grateful when you’re rummaging through the freezer at dawn.
- Oven reheating: My preferred method! For fridge-cold slices, bake uncovered at 325°F for 15-20 minutes until heated through. Frozen? Add 10 extra minutes, but cover with foil for the first half to prevent drying out.
- Microwave shortcut: Place a single portion on a microwave-safe plate, cover loosely with a damp paper towel (keeps it moist!), and zap for 1-2 minutes. Check the center—if it’s still cold, give it 30-second bursts until perfect.
A little secret? The flavors actually improve after a day in the fridge—the ham gets more savory and the cheese mellows. I’ve been known to “accidentally” make extra just for next-day lunches!
Farmer Breakfast Casserole FAQs
Over the years, I’ve fielded just about every question imaginable about this casserole—some from my grandkids, some from neighbors who smelled it baking, and even a few from panicked cooks at 6 AM. Here are the answers to the ones I hear most often:
Can I use fresh potatoes instead of frozen hash browns?
Absolutely! Grate about 2 medium russet potatoes (peeled or unpeeled—your call), then squeeze them in a clean towel to remove excess moisture. Spread them in a single layer on a baking sheet and pop them in a 400°F oven for 10 minutes to dry slightly before using. This extra step prevents a soggy casserole.
How do I know when the casserole is fully cooked?
Look for three signs: the edges should be golden and pulling away from the pan, the center shouldn’t jiggle when you nudge the dish, and a knife inserted about an inch from the center should come out clean. If you see wet egg mixture, give it 5 more minutes—better safe than sorry!
Can I prepare this the night before?
You betcha! Assemble everything except the egg mixture in your baking dish, cover tightly, and refrigerate overnight. In the morning, whisk your eggs and milk, pour over the top, and bake as directed—just add 5-10 minutes to the cooking time since everything will be cold from the fridge.
What’s the best way to reheat leftovers?
My favorite method is the oven—325°F for about 15 minutes keeps the texture perfect. But if you’re in a hurry, the microwave works too! Just cover your slice with a damp paper towel and heat in 30-second bursts so it doesn’t dry out.
Can I freeze this casserole?
Yes indeed! Bake it completely, let it cool, then wrap individual portions tightly in foil before freezing. To reheat, bake frozen slices at 350°F for 25-30 minutes (no need to thaw first). The texture won’t be quite as perfect as fresh, but it’ll still taste mighty fine on a busy morning!
Nutritional Information
Now, I’m no nutritionist—just a grandma who knows good food—but I figured some of you might want the nitty-gritty details about what’s in this hearty casserole. These numbers are estimates based on my trusty old cookbook calculations, but remember: ingredients vary, serving sizes differ, and life’s too short to count every crumb!
- Calories: About 320 per generous slice
- Protein: 18g (Those eggs and ham pack a punch!)
- Carbohydrates: 22g (Mostly from those wholesome potatoes)
- Sugar: 4g (Natural sugars from the milk and onions)
- Sodium: 580mg (Go easy on extra salt if you’re watching this)
- Fat: 18g (The good kind—cheese and eggs do most of the work here)
My philosophy? A balanced plate with some fruit on the side makes this casserole part of a perfectly respectable breakfast. And honestly? When my grandkids are eating something this nourishing without complaint, I call that a win no matter what the numbers say!
Equipment You’ll Need
Now don’t go thinking you need fancy gadgets to make this casserole shine—half the charm is its simplicity! Here’s what you’ll want within arm’s reach when you start cooking:
- A trusty 2-quart baking dish – My speckled blue enamel one has served me well since 1982, but glass or ceramic works just fine. (No metal pans unless you love extra-crispy edges!)
- One good mixing bowl – Medium-sized, with some room to whisk without splashing egg on your apron. I prefer stainless steel—it won’t hold onto odors like plastic does.
- A sturdy whisk – Nothing fancy, just something to beat those eggs into submission. Mine’s so old the handle’s worn smooth, but it gets the job done!
- Measuring cups and spoons – I still use the tin ones my mama gave me when I got married. The markings are faded, but my hands know them by heart now.
- A sharp knife – For dicing ham and slicing green onions. My paring knife does double duty when I’m feeling lazy.
- Cheese grater – If you’re shredding your own cheese (which you really should!), a box grater works better than those fancy rotary ones that always jam up.
That’s it! No stand mixers, no special tools—just good old-fashioned kitchen basics. Though I will say, having a cute oven mitt and a wooden spoon you love makes the whole process more joyful. (Mine has a heart-shaped cutout in the handle—silly little things make cooking fun!)
Rate This Recipe
Well butter my biscuit, I’d love to hear how your farmer breakfast casserole turned out! Did your family gobble it up like mine always does? Maybe you put your own spin on it with some extra veggies or a sprinkle of hot sauce? Whatever happened in your kitchen, I want all the delicious details!
- Did the evaporated milk make it extra creamy like I promised?
- What add-ins did you try (and would you do it again)?
- How long did it take before someone asked for seconds?
- Any funny kitchen mishaps? (My first attempt back in ’69 overflowed like a volcano—lesson learned!)
Your notes help other home cooks know what to expect, and they make my day brighter than a sunny farmhouse window! Just between us, reading your stories reminds me why I’ve kept cooking all these years—food tastes better when it’s shared. If you’re looking for more comfort food inspiration, check out my collection of recipes!
Now scoot—go enjoy that casserole while it’s warm! And don’t forget to come back and tell me all about it. After all, good recipes—like good stories—get better when they’re passed around.
For More recipes, Follow me on Facebook!






