
You know that moment when the scent of sage and butter fills the kitchen, and suddenly, it feels like Thanksgiving? That’s the magic of my Delicious Grandma’s Thanksgiving Stuffing—a recipe that’s been on our table for as long as I can remember. Every bite takes me back to crowded kitchens, laughter over second helpings, and my own grandma whispering, “Jo, taste this—needs a pinch more thyme, don’t you think?”

Table of Contents
Table of Contents
This stuffing isn’t just a side dish—it’s a hug in a baking dish. The crispy golden top gives way to a soft, herby center packed with tender onions, celery, and just the right amount of buttery goodness. Whether it’s tucked beside a roasted turkey or sneaked onto plates for midnight leftovers, it’s the one dish my grandkids beg for year after year. And trust me, once you try it, you’ll understand why.
Why You’ll Love This Delicious Grandma’s Thanksgiving Stuffing
This stuffing isn’t just good—it’s the kind of dish that makes people close their eyes and sigh after the first bite. Here’s why it’ll become your new holiday must-have:
- Simple as pie (but tastier!) – Just cube bread, sauté veggies, mix, and bake. No fancy techniques needed.
- Herb heaven – Fresh sage, thyme, and rosemary make it sing with that classic Thanksgiving aroma.
- Crowd-pleaser magic – Even picky eaters go back for seconds. My grandson once ate three helpings!
- Better than store-bought – That boxed stuff? Forget it. This tastes like real home cooking.
- Makes memories – The scent alone will have your family gathered around the oven, just like mine always does.
And here’s my secret—it’s even better the next day, if there’s any left!
Ingredients for Delicious Grandma’s Thanksgiving Stuffing
Now, don’t you go skimping on quality—this stuffing deserves the good stuff! Here’s what you’ll need to make it just like Grandma Jo does:

- Bread – 10 cups cubed sourdough or French bread (stale or lightly toasted—trust me, fresh bread turns to mush!)
- Onion – 1 large, finely diced (none of those chunky pieces—we want flavor in every bite)
- Celery – 2 cups finely chopped (about 3-4 stalks, leaves and all for extra herby goodness)
- Fresh herbs – 2 tbsp sage, 2 tbsp thyme, 1 tbsp rosemary (all finely chopped—no dried herbs here, please!)
- Low-sodium broth – 4 cups chicken or vegetable (homemade if you’ve got it—your tastebuds will thank you)
- Unsalted butter – ½ cup (that’s 1 stick, melted—salted butter makes it too salty with the broth)
- Salt and pepper – To taste (start with ½ tsp salt—you can always add more after mixing)
See? Nothing fancy—just real ingredients that make real flavor. Now let’s get cooking!
Equipment Needed to Make Delicious Grandma’s Thanksgiving Stuffing
No fancy gadgets required—just the basics from your kitchen that’ll make this stuffing come together like a dream:
- Large mixing bowl – Big enough to toss all those bread cubes and veggies without making a mess
- Skillet – For sautéing onions and celery to buttery perfection
- 9×13-inch baking dish – Or any similar-sized casserole dish—just make sure it’s greased!
- Aluminum foil – To keep things moist during the first half of baking
- Measuring cups and spoons – No eyeballing those herbs—Grandma didn’t raise no guessers!
That’s it! Now let’s get to the good part—making the magic happen.
How to Make Delicious Grandma’s Thanksgiving Stuffing
Alright, let’s roll up our sleeves and make some magic! Follow these steps, and you’ll have stuffing so good, folks’ll be scraping the baking dish clean. Don’t worry—it’s easier than it looks.

Step 1: Prepare the Bread and Vegetables
First things first—the bread. Grab your sourdough or French loaf and slice it into ½-inch cubes (no need to be perfect here). Spread them on a baking sheet and let ’em sit out overnight to stale up. In a pinch? Toast ’em lightly at 300°F for 10 minutes—just until they’re dry but not browned.
While that’s happening, finely dice your onion (tears are optional but traditional!) and chop the celery—leaves included for extra flavor. Chop those fresh herbs nice and fine—you want their flavor to weave through every bite.
Step 2: Sauté the Vegetables
Melt that stick of butter in a skillet over medium heat—oh, that smell already has me nostalgic! Toss in the onions and celery with a pinch of salt and pepper. Cook ’em, stirring often, until they’re soft and translucent (about 5-7 minutes). Don’t let ’em brown—we’re going for tender, not crispy!
Step 3: Combine Ingredients
Dump your bread cubes into that big mixing bowl. Pour the buttery veggies right over the top, then shower everything with those chopped herbs. Toss it all together gently—like you’re folding a fluffy blanket, not wrestling a pillow!
Now, here’s the key: warm your broth slightly (just 30 seconds in the microwave does it) and pour it in gradually, stirring as you go. Stop when the bread is moist but not soggy—you might not need all the broth. Give it a taste and adjust salt and pepper if needed.
Step 4: Bake the Stuffing
Pour the mixture into your greased baking dish, pressing it down lightly. Cover snugly with foil and bake at 350°F for 30 minutes—this lets the flavors cozy up together. Then, remove the foil and bake another 15 minutes until the top is golden and crisp at the edges.
Let it rest 5 minutes before serving (hardest wait of the day!). That’s it—stuffing fit for a Thanksgiving table, just like Grandma Jo used to make.
Print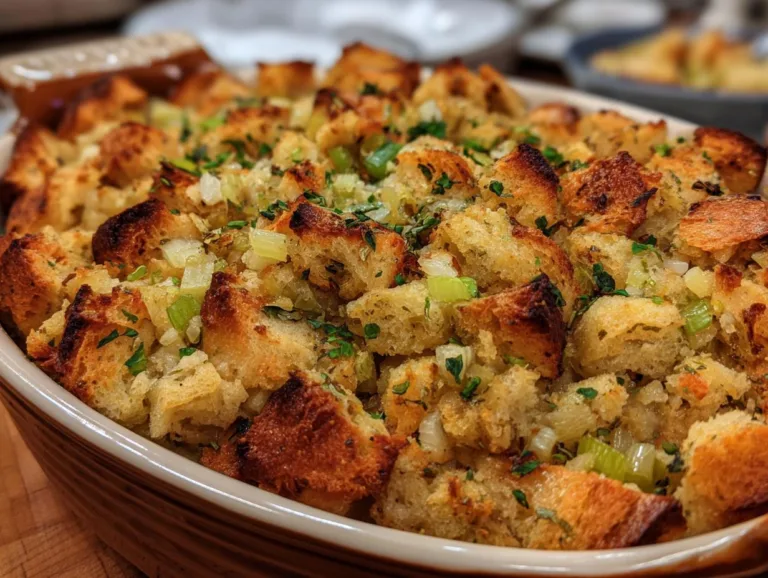
Grandma’s 5-Star Thanksgiving Stuffing Recipe For Everyone
A classic Thanksgiving stuffing recipe passed down through generations, featuring sourdough or French bread, fresh herbs, and savory vegetables for a comforting side dish.
- Total Time: 1 hour 5 minutes
- Yield: 8 servings
Ingredients
- Bread (sourdough or French): 10 cups cubed
- Onion: 1 large, finely diced
- Celery: 2 cups, finely chopped (about 3-4 stalks)
- Fresh herbs: 2 tbsp sage, 2 tbsp thyme, 1 tbsp rosemary (all finely chopped)
- Low-sodium broth: 4 cups (chicken or vegetable)
- Unsalted butter: ½ cup (1 stick), melted
- Salt and pepper: To taste
Instructions
- Preheat oven to 350°F (175°C). Cube the bread and allow it to dry overnight or toast it lightly. Finely chop the onion, celery, and fresh herbs.
- Melt butter in a large skillet over medium heat. Add the onion and celery, cooking until tender (5-7 minutes). Season lightly with salt and pepper.
- Place bread cubes in a large mixing bowl. Pour the sautéed vegetable mixture over them. Add chopped herbs, then season with additional salt and pepper.
- Gradually stir in warm broth until the mixture is evenly moistened.
- Transfer the stuffing to a greased baking dish. Cover with aluminum foil and bake for 30 minutes.
- Remove foil and bake an additional 15 minutes, or until the top is golden brown and crisp.
- Let the stuffing cool slightly before serving. Enjoy it as a side dish with turkey or other festive favorites!
Notes
- For extra flavor, use homemade broth or add a splash of white wine.
- You can prepare the bread cubes a day ahead to save time.
- Adjust herb quantities to suit your taste preferences.
- Prep Time: 20 minutes
- Cook Time: 45 minutes
- Category: Side Dish
- Method: Baking
- Cuisine: American
- Diet: Vegetarian
Nutrition
- Serving Size: 1 cup
- Calories: 250
- Sugar: 3g
- Sodium: 450mg
- Fat: 10g
- Saturated Fat: 5g
- Unsaturated Fat: 4g
- Trans Fat: 0g
- Carbohydrates: 35g
- Fiber: 3g
- Protein: 5g
- Cholesterol: 20mg
Tips for Perfect Delicious Grandma’s Thanksgiving Stuffing
After decades of making this stuffing, I’ve learned a few tricks to take it from good to “Grandma-worthy” every single time. Here’s how to make yours unforgettable:
- Homemade broth is your secret weapon – That gelatin-rich goodness adds depth no store-bought version can match. Don’t have time? Jazz up boxed broth with a splash of white wine or apple cider.
- Prep bread cubes the night before – Spread them on a baking sheet before bed, and wake up to perfectly stale bread—no toasting needed!
- Herb freshness matters – Rub them between your palms before chopping to release their oils. Too strong? Cut rosemary to ½ tbsp—it shouldn’t overpower.
- Broat test – Squeeze a handful of mixed stuffing—it should hold shape without dripping. Too dry? Add broth ¼ cup at a time.
- Rest before serving – Those 5 minutes off heat let flavors settle beautifully.
Remember—good stuffing waits for no turkey, but it does improve with love (and butter)!
Variations of Delicious Grandma’s Thanksgiving Stuffing
Now, don’t go thinking this stuffing is set in stone—half the fun is making it your own! Here are my favorite ways to shake things up while keeping that classic comfort:

- Sweet & savory twist – Toss in ½ cup dried cranberries or golden raisins with the herbs—they plump up beautifully and add little pops of sweetness.
- Herb swap – Not a rosemary fan? Try flat-leaf parsley or a pinch of marjoram instead. My niece swears by adding a bit of chopped fresh tarragon!
- Meat lover’s delight – Brown ½ lb sausage (mild or spicy!) with the onions—just drain most of the fat first. Bacon bits work too—because everything’s better with bacon.
- Nutty crunch – Stir in ¾ cup toasted pecans or walnuts right before baking for texture that’ll make everyone swoon.
The best part? No matter how you tweak it, that buttery, herby soul stays the same—just like Grandma would want it.
Serving Suggestions for Delicious Grandma’s Thanksgiving Stuffing
Oh honey, this stuffing was made for sharing! Pile it high next to golden roasted turkey—the way the gravy seeps into those crispy edges? Pure magic. Don’t forget the mashed potatoes and green bean casserole for the ultimate holiday plate. And between you and me? It’s downright heavenly reheated next to leftover turkey sandwiches the next day.
Storage and Reheating Instructions for Delicious Grandma’s Thanksgiving Stuffing
Now, if by some miracle you have leftovers (my grandkids usually demolish it all!), here’s how to keep that stuffing tasting fresh: Cool it completely, then tuck it into an airtight container in the fridge—it’ll stay happy for 3 days. To reheat, splash a tablespoon of broth over the top and warm it in the oven at 325°F until toasty (about 15 minutes), or zap individual portions in the microwave for 60-90 seconds. Just like day one—maybe even better!
Nutritional Information for Delicious Grandma’s Thanksgiving Stuffing
Now, I won’t lie to you—this stuffing isn’t exactly health food, but it is made with love and real ingredients! Nutritional values can vary depending on your bread choice, broth type, and how much butter your heart tells you to use (mine always says “more”). Treat these numbers as friendly estimates—what really matters is those happy tastebuds around your table!
Frequently Asked Questions About Delicious Grandma’s Thanksgiving Stuffing
Over the years, I’ve fielded every stuffing question under the sun—here are the ones folks ask most often (along with my tried-and-true answers)!
Can I use gluten-free bread for this stuffing?
Absolutely! Just pick a sturdy gluten-free loaf (something like sourdough-style works best), cube it, and let it dry overnight. The texture might be slightly different, but the flavor will still be wonderful. My granddaughter makes it this way every year, and nobody ever guesses!
Can I prepare the stuffing ahead of time?
You bet—this is one of my favorite make-ahead tricks! Assemble everything up to the baking step, cover tightly, and refrigerate for up to 24 hours. Just add 5-10 extra minutes to the baking time since it’ll be cold. Some say it tastes even better as the flavors meld!
How do I keep the stuffing from drying out?
Three words: broth, butter, and foil! Always warm your broth before adding (cold liquid absorbs slower), don’t skimp on that melted butter, and keep it covered with foil for the first half of baking. If it still seems dry after reheating, drizzle a little extra warm broth over the top.
Can I freeze leftover stuffing?
Oh honey, I’ve been freezing Thanksgiving leftovers since before freezer bags were invented! Portion cooled stuffing into airtight containers (leave some room for expansion) and freeze for up to 3 months. Thaw overnight in the fridge, then reheat with a splash of broth to revive that perfect texture.
Still got questions? Just holler—I’ve probably got a story (and a solution) for every stuffing snafu!
For More recipes, Follow me on Facebook!






