
Oh, these Mini Cherry Pie Bites! Just the smell of them baking takes me right back to my grandmother’s kitchen—where everything was simpler, sweeter, and made with love. After decades of baking, I can tell you this: nothing beats the classic combo of flaky crescent dough and juicy cherry filling, especially when it’s bite-sized and ready in under 30 minutes. These little gems are my go-to when I need a quick dessert that feels special. Trust me, once you try them, you’ll understand why they’ve been a family favorite for generations. And the best part? They’re so easy, you’ll wonder why you didn’t make them sooner.

Table of Contents
Table of Contents
Why You’ll Love These Mini Cherry Pie Bites
Let me count the ways these little cuties will steal your heart—just like they stole mine back in ’78 when I first whipped them up for a church potluck. Here’s why you’ll adore them:
- Quick magic: From fridge to table in under 30 minutes – even my grandkids can help!
- Pantry heroes: Uses those cans of cherry filling and crescent rolls you probably have right now
- Party perfect: One batch makes exactly 12 bites – no slicing, no mess, just grab-and-go goodness
- Crowd pleaser: That nostalgic cherry pie flavor in every single bite-sized package
- Versatile charm: Dress ’em up with glaze for company or keep ’em simple for after-school snacks
Honestly, I’ve never met anyone who could resist popping one (or three!) of these warm, flaky treats. If you are looking for more quick dessert ideas, check out our general recipes section!
Ingredients for Mini Cherry Pie Bites
Now let’s talk ingredients – and I mean exact ingredients, because trust me, I’ve learned the hard way that substitutions can lead to mini disasters! Here’s what you’ll need:

- 1 (21 oz) can cherry pie filling – don’t even think about skimping here, we want those plump, juicy cherries
- 2 (8 oz) tubes crescent roll dough – and I mean the regular kind in that familiar cylindrical package, not the sheets!
- 1 cup powdered sugar, sifted – I sift right into my measuring cup to avoid any stubborn lumps
- 1-2 tablespoons milk – whole milk or 2% gives the glaze that perfect creamy consistency
That’s it – just four simple ingredients standing between you and cherry pie heaven!
How to Make Mini Cherry Pie Bites
Alright, let’s get these little beauties going! I’ve made hundreds of batches over the years, and I’ve got the process down to a science. Follow these steps, and you’ll have perfect mini cherry pie bites every single time.

Prep the Dough and Filling
First things first – preheat that oven to 375°F (190°C). While it’s heating up, lightly grease your muffin tin – I just give it a quick spray with nonstick cooking spray. Now for the fun part! Unroll those crescent dough tubes (careful – they pop open with a bang!) and separate them into triangles along the perforations. The triangles should look like little pizza slices – that’s what we want!
Here’s my pro tip: place each triangle into a muffin cup with the wide end at the bottom and the pointy tip sticking up. Press it gently into the cup – no need to be perfect here. Now for the filling – use a heaping tablespoon (about 3-4 cherries worth) per cup. Warning: resist the urge to overfill! I learned this the messy way – too much filling means cherry lava bubbling over in your oven.
Assemble and Bake
This next step is where the magic happens. Take those pointy dough corners and fold them over the filling, pressing lightly to seal. Don’t worry if they don’t completely cover – we’re going for rustic charm here! Pop them in the oven and set your timer for 13 minutes.
Now, here’s where you need to pay attention. At around 12 minutes, start watching for that perfect golden-brown color on the edges. Every oven is different – mine usually takes exactly 13 minutes and 30 seconds (yes, I’m that precise!). When they’re done, they should look like little golden nests filled with ruby-red cherries.
Make the Glaze
While the bites are baking, let’s whip up that simple glaze. In a small bowl, sift your powdered sugar (this prevents lumps – trust me!). Start with just 1 tablespoon of milk and whisk until smooth. Want it thicker? Add more sugar. Thinner? More milk. I like mine just pourable enough to drizzle beautifully off a spoon.
As soon as the bites come out of the oven (careful – they’re hot!), drizzle that glaze over them while they’re still warm. The heat helps it melt into all the nooks and crannies. And voila! You’ve just made the easiest, most delicious mini cherry pie bites this side of grandma’s kitchen.
Print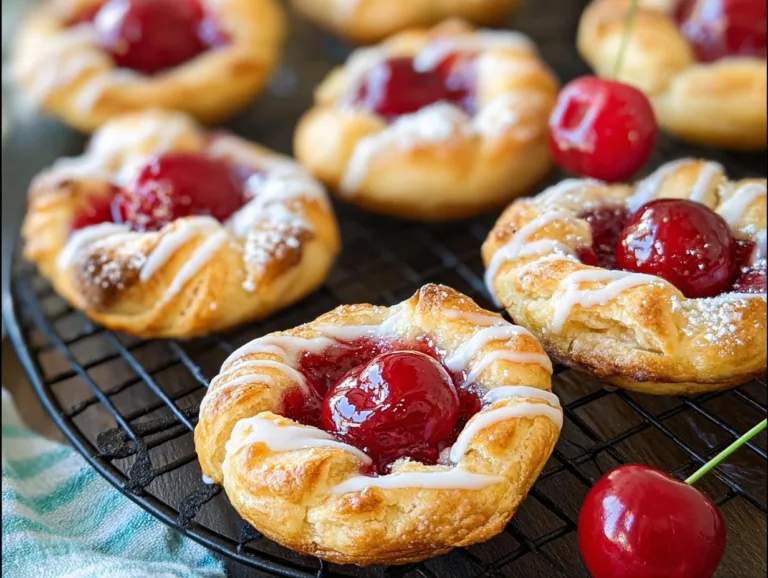
12 Irresistible Mini Cherry Pie Bites You’ll Crave
Quick and easy mini cherry pie bites that bring the classic flavors of cherry pie in a convenient, bite-sized form.
- Total Time: 24 mins
- Yield: 12 bites 1x
Ingredients
- 1 21 oz can cherry pie filling
- 2 8 oz tubes crescent roll dough
- 1 cup powdered sugar
- 1–2 tablespoons milk
Instructions
- Preheat your oven to 375°F (190°C). Lightly grease a standard muffin tin with nonstick cooking spray.
- Unroll the crescent roll dough and place each piece into a muffin tin, positioning the widest part at the bottom.
- Spoon cherry pie filling into each dough cup, using about 3 to 4 heaping tablespoons.
- Gently fold the dough corners over the filling to enclose it as much as possible.
- Bake for 13-14 minutes, or until golden brown.
- In a small bowl, whisk together the powdered sugar and milk until smooth.
- Drizzle the glaze over the warm cherry bites and serve.
Notes
- Use any leftover glaze for extra sweetness.
- Adjust milk in the glaze for your preferred consistency.
- Serve warm for the best taste.
- Prep Time: 10 mins
- Cook Time: 14 mins
- Category: Dessert
- Method: Baking
- Cuisine: American
- Diet: Vegetarian
Nutrition
- Serving Size: 1 bite
- Calories: 150
- Sugar: 12g
- Sodium: 180mg
- Fat: 6g
- Saturated Fat: 2g
- Unsaturated Fat: 3g
- Trans Fat: 0g
- Carbohydrates: 22g
- Fiber: 1g
- Protein: 2g
- Cholesterol: 0mg
Expert Tips for Perfect Mini Cherry Pie Bites
After burning my fingers on more cherry fillings than I can count, let me share the little secrets that’ll make your mini cherry pie bites foolproof:

- Chill that dough! If it gets too sticky (especially in summer), pop the unopened tubes in the fridge for 15 minutes – makes unrolling so much easier.
- Go heaping with those cherry filling tablespoons – but not overflowing. Think “generous scoop” not “mountain.”
- Glaze while warm – not hot! That sweet spot when they’ve cooled just enough to handle makes the glaze soak in perfectly without melting away.
And here’s my bonus tip: keep an extra can of filling handy – someone always wants seconds! If you’re interested in other quick sides, you might enjoy my garlic herb roasted potatoes.
Mini Cherry Pie Bites Variations
Oh honey, don’t think you’re stuck with just cherries! Over the years, I’ve played around with this recipe more times than I can count. Here are my favorite twists:
- Fruit swap: Try apple pie filling with a dash of cinnamon, or go wild with blueberry – both are heavenly!
- Spiced glaze: Add 1/4 teaspoon cinnamon or nutmeg to the powdered sugar for extra warmth.
- Crunchy topping: Sprinkle crushed pecans or walnuts right after glazing for texture.
The beauty? Each version tastes like a whole new dessert while keeping that same easy charm. Try swapping the filling for something like the hot spinach artichoke dip filling for a savory twist!
Serving and Storing Mini Cherry Pie Bites
Here’s the truth – these mini cherry pie bites are absolute magic fresh from the oven when that glaze is still slightly gooey. Serve them warm on a pretty platter, and watch them disappear faster than you can say “seconds please!”
If you’ve got leftovers (unlikely, but it happens), pop them in an airtight container – they’ll keep for about 2 days. When you’re ready for round two, reheat them in a 300°F oven for 5 minutes.
Warning: microwaving turns that flaky crust soggy, and we can’t have that!
Mini Cherry Pie Bites Nutritional Information
Now, I’m no nutritionist, but here’s the scoop on these sweet little bites – each one clocks in at about 150 calories. They’ve got 6g of fat (just 2g saturated), 22g carbs, and a happy 12g of sugar per pop. Perfect for when you want just a taste of something sweet without going overboard.
Remember, these numbers can vary a smidge depending on your exact ingredients – especially how generous you are with that glaze!
FAQs About Mini Cherry Pie Bites
Can I use homemade cherry pie filling?
Absolutely! Just make sure to drain any excess liquid first – too much juice makes the dough soggy. I’ve used my homemade filling many times, but honestly? The canned stuff works just as well in a pinch.
Can I freeze these mini cherry pie bites?
Oh honey, I don’t recommend it. The crescent dough loses its flaky magic after freezing, and the filling gets watery when thawed. They’re so quick to make fresh – trust me, it’s worth the 20-minute wait!
Why can’t I use crescent roll sheets?
Those flat sheets seem tempting, but they don’t form those perfect little cups like the triangles do. The perforated dough gives you those foldable corners that make these bites so charming.
How do I prevent the glaze from hardening?
If you want that glossy, drizzle-ready glaze, just add a tiny bit more milk (1/2 teaspoon at a time) until it’s pourable but still thick. It’ll set slightly but stay deliciously creamy.
For More recipes, Follow me on Facebook!






